Upgrader User Guide
1. Software Installation
-
Verify that your system meets the following requirements:
Item Requirement Architecture x86_64 (AMD64) Operating System Ubuntu 22.04 LTS / Ubuntu 24.04 LTS Memory At least 4 GB RAM Storage At least 2 GB available space Permissions Serial port access required Network Stable network connection -
Go to GitHub Releases to download the installation package
-
Navigate to the package directory and install the package
# Replace <package-name> with the actual downloaded package name
sudo apt install ./<package-name>.deb
After installation, the system automatically handles the following—no manual setup needed:
- Configure serial port access permissions
- Add your user to required groups
- Set up hardware access permissions
For dependency or serial port permission issues, see Troubleshooting.
2. Device Connection
2.1 Launch the Software
Before launching the application, ensure Wuji Hand is powered off.
Method 1: Search for wujihand-upgrader in the application menu and click the icon to launch
Method 2: Run the command in the terminal
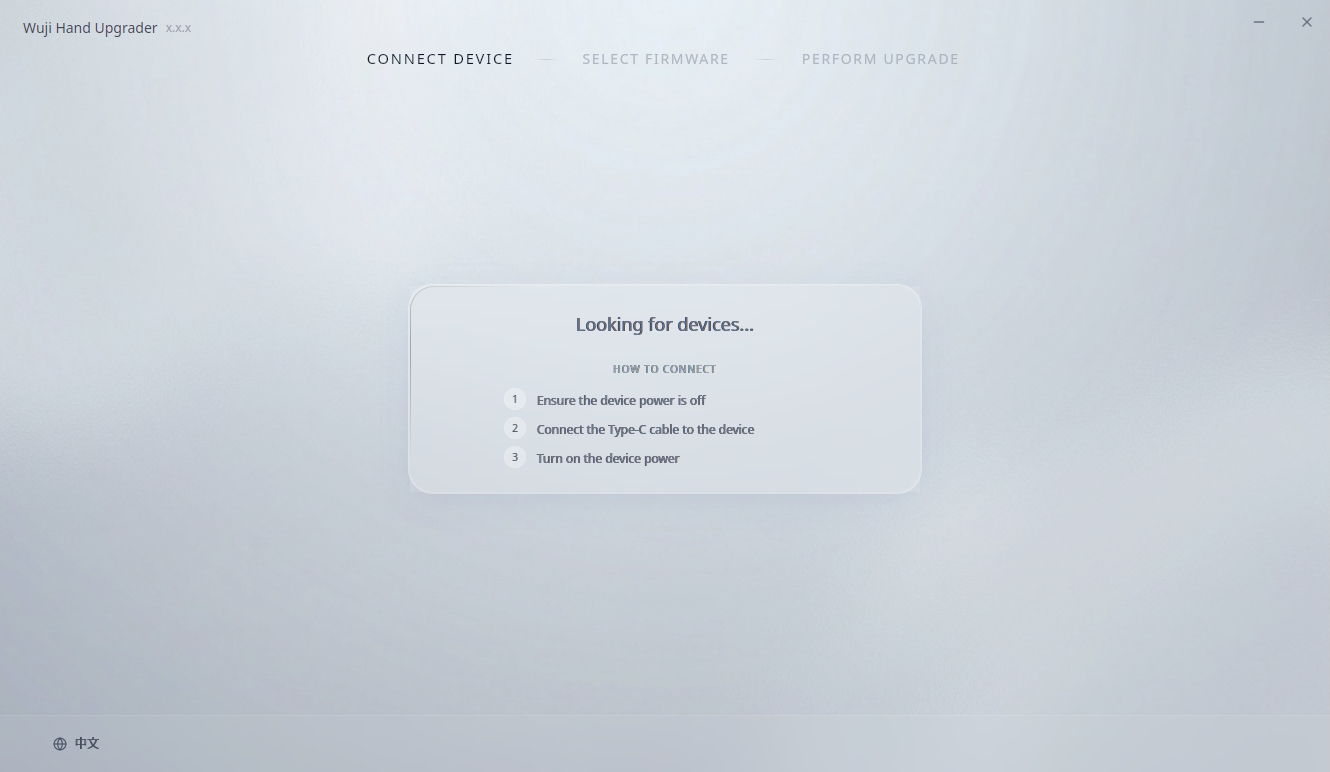
wujihand-upgraderThe main interface looks like this:
The first launch may take longer as the application extracts and initializes.
2.2 Hardware Connection
With Wuji Hand still powered off, connect it to the computer using the USB A to USB C cable included in the package, then power on the hand.
2.3 Automatic Connection
After Wuji Hand is powered on, the application automatically scans for devices, connects to the Bootloader, and waits for the connection to establish.
The device must be in Bootloader mode for firmware upgrade. If the software prompts that the device is not in Bootloader mode, keep the USB connected, power off the hand, then power it on again and retry.
2.4 Device Information Display
After successful connection, the interface displays the following device information:
- PORT: Serial port path of the connected device (e.g., /dev/ttyUSB*)
- SYSTEM VERSION: Current system version of the device
- NODE STATUS: Online nodes/Total nodes (hover over the info icon to view detailed node version information)
- STATUS: Current device status (for example, Ready)
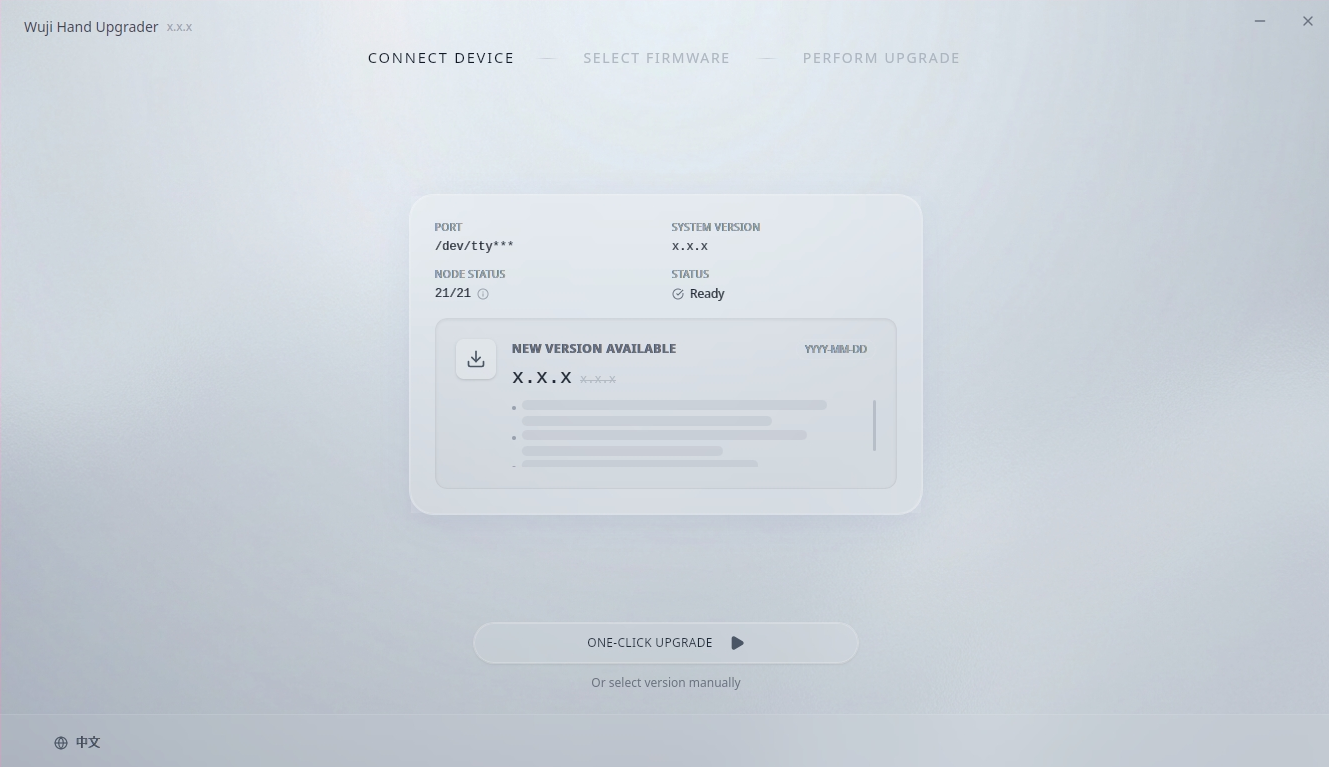
After confirming the device information, proceed with the firmware upgrade.
3. Firmware Upgrade
During the upgrade, do not disconnect the USB connection, close the upgrade software, or disconnect device power. Keep the computer active and avoid entering sleep mode.
3.1 One-Click Upgrade (Recommended)
-
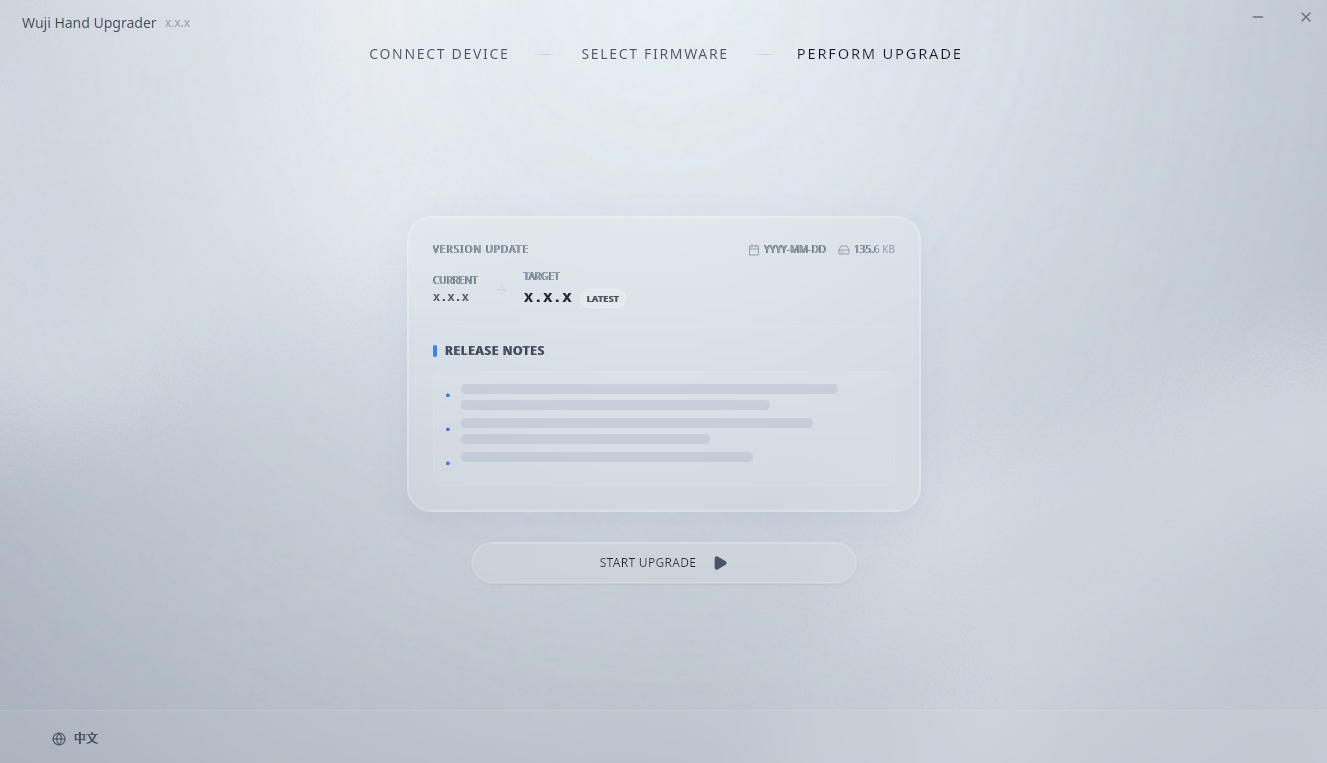
On the CONNECT DEVICE screen, click ONE-CLICK UPGRADE to open the PERFORM UPGRADE screen.
-
After confirming the device information and target version, click START UPGRADE.
-
The software automatically performs the following operations and waits for the upgrade to complete:
- Download the latest firmware
- Verify firmware integrity
- Execute the flashing operation
-
After the upgrade completes, the software opens the Update Complete screen. See 3.3 Upgrade Complete for the closing steps.
3.2 Manual Firmware Selection
If you need a specific firmware version or a local firmware file, use manual selection mode. On the CONNECT DEVICE screen, below ONE-CLICK UPGRADE, click Or select version manually to open the SELECT FIRMWARE screen.
- The left side shows firmware details and RELEASE NOTES
- The right side shows the AVAILABLE list
- The lower-right area shows Upload Local Firmware and INSTALL FIRMWARE
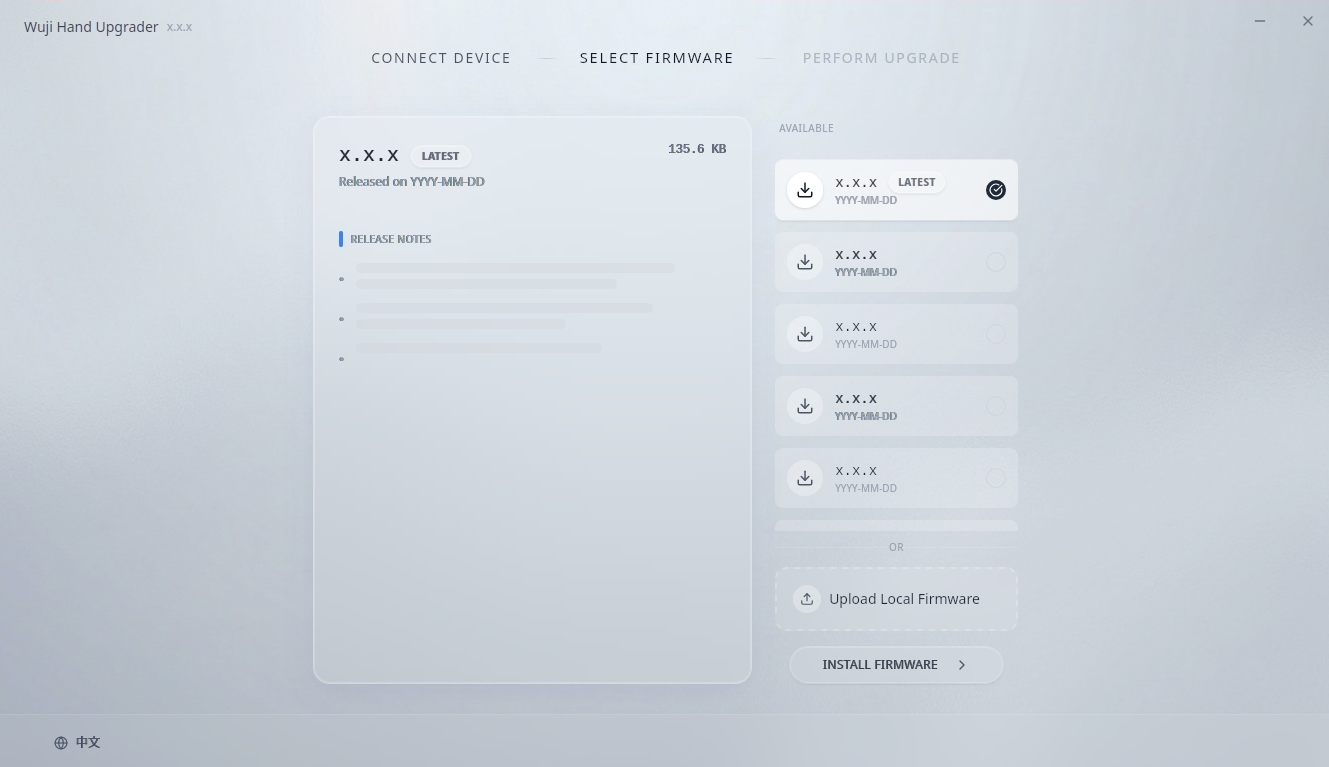
3.2.1 Select Online Firmware
- In the AVAILABLE list, select the desired firmware version.
- Click the version card to select it.
- Click INSTALL FIRMWARE to start the upgrade.
3.2.2 Select Local Firmware
- Click Upload Local Firmware.
- Select the local firmware archive file (.zip format).
- Wait for file extraction and verification to complete.
- Click INSTALL FIRMWARE to start the upgrade.
After clicking INSTALL FIRMWARE, wait for the flashing to complete, then follow 3.3 Upgrade Complete for the closing steps.
3.3 Upgrade Complete
After the upgrade flow finishes, the software opens the Update Complete screen with Firmware version verified.
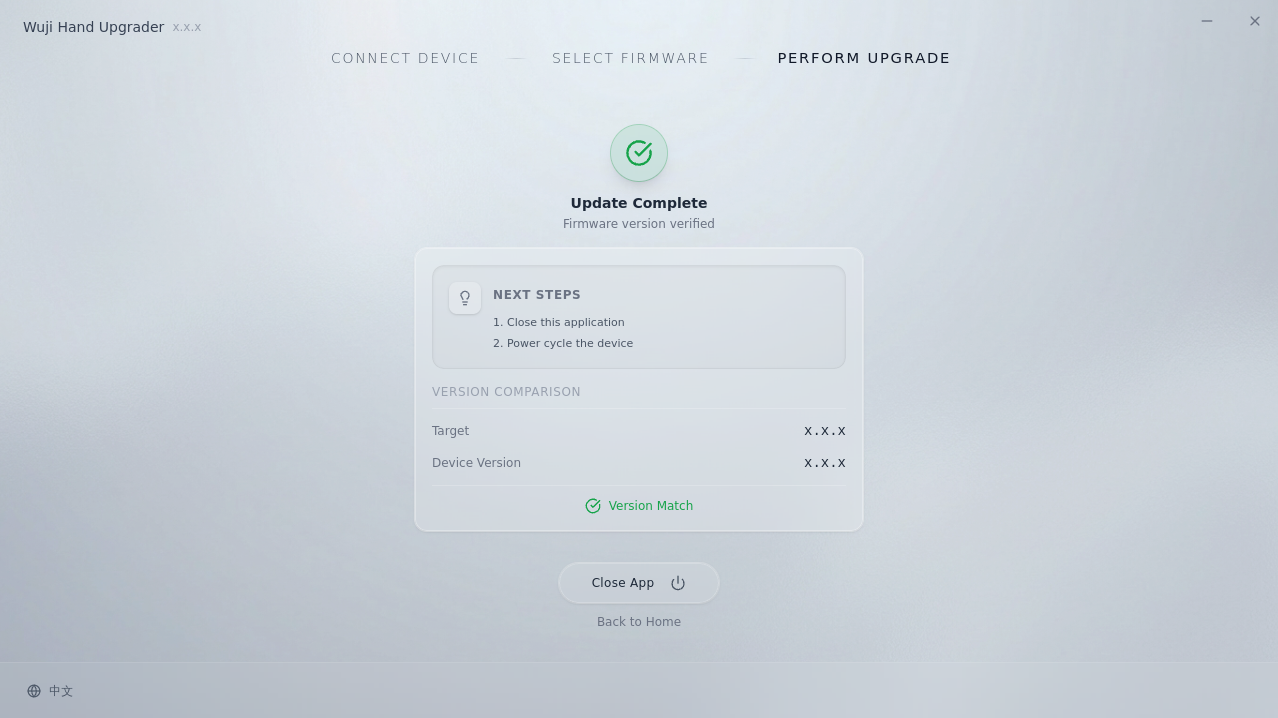
The screen displays:
- NEXT STEPS: Close this application and Power cycle the device
- VERSION COMPARISON: Current vs Target, marked Version Match
To finish the upgrade:
- Click Close App to exit the Upgrader, or click Back to Home to continue upgrading another device.
- Power off Wuji Hand, then power it on again to exit Bootloader mode and return to normal operation.
4. Troubleshooting
4.1 Installation Dependency Issues
If dependency issues occur when installing the deb package, run the following command to fix them:
sudo apt-get install -f4.2 Serial Port Permission Issues
If the software reports insufficient serial port permissions, use one of the following methods:
sudo wujihand-upgraderOr add your user to the dialout group (recommended, no sudo needed each time):
sudo usermod -a -G dialout $USER
newgrp dialout
wujihand-upgrader
4.3 Upgrader Window Not Displaying
If clicking the desktop icon shows the upgrader icon in the taskbar but the main window never appears, start the upgrader from a terminal for troubleshooting.
If the terminal shows Failed to create GBM buffer of size 1280x720: Permission denied (GBM buffer error), it usually means the NVIDIA driver does not have DRM Kernel Mode Setting enabled. For background information, see dioxus#1909.
To resolve this issue:
-
Check if modesetting is enabled:
cat /sys/module/nvidia_drm/parameters/modeset -
If the output is
N, enable it with the following command:echo options nvidia_drm modeset=1 | sudo tee /etc/modprobe.d/nvidia_drm.conf -
Restart the computer, then launch the upgrader again.
5. Uninstall
To remove Wuji Hand Upgrader, run the following command:
sudo apt remove wujihand-upgrader