> ## Documentation Index
> Fetch the complete documentation index at: https://docs.wuji.tech/llms.txt
> Use this file to discover all available pages before exploring further.
# Device Calibration
Calibration builds a hand model that matches your hand, so fingertip pinches, four-finger bends, and other gestures produce expected output. Results are saved per Studio user profile and per hand, so Wuji Gloves for the same hand share one result under the same profile. Recalibrate at any time.
**Recalibrate after upgrading to Studio 2026.7.14**: Calibration files created before 2026.7.14 don't match the new storage format, and Studio doesn't migrate them. Calibration results are stored per user profile, so **calibrate the left and right hands again in every profile you have calibrated**.
Studio's built-in hand retargeting algorithm and default URDF model are upgraded, so uncalibrated devices already perform well:
* Start with the default configuration
* If results fall short of expectations, create a [user profile](/en/docs/wuji-studio/basic-settings#user-profile) and calibrate the device
Switch to your own named profile before you start. The generated URDF is saved per user profile, and the `Default` profile doesn't store calibration results. See [Basic Settings > User Profile](/en/docs/wuji-studio/basic-settings#user-profile) for how to create one.
Watch the [calibration video tutorial](https://www.youtube.com/watch?v=LdbhNvbI9Ig) for a full walkthrough.
## Calibration Home
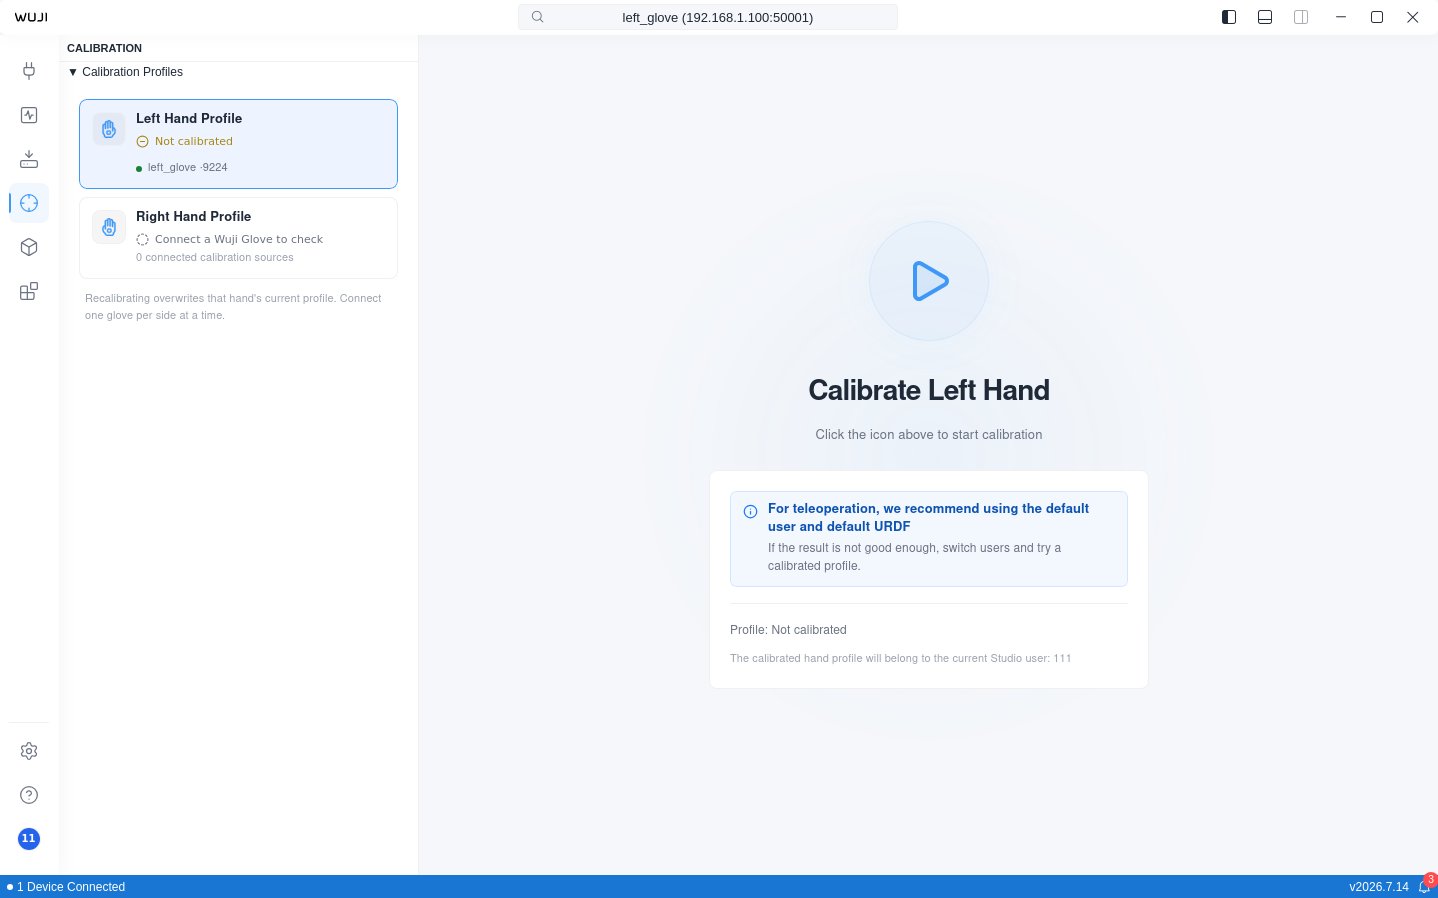
Before opening calibration, pair your Wuji device on the [Device Connection](/en/docs/wuji-studio/device-connection) page. Click the **Calibration** icon on the Activity bar to enter the home page. The **Calibration Profiles** sidebar on the left always lists two profiles, **Left Hand Profile** and **Right Hand Profile**. Each one shows your calibration status for that hand, along with the connected gloves available as capture sources. The right side is the calibration entry, with the **Calibrate Left Hand** or **Calibrate Right Hand** heading, the start button, and that hand's profile status and owner.
Profile statuses in the sidebar:
| Status | Meaning |
| - | - |
| **Calibrated** | You already have a result for this hand |
| **Not calibrated** | You don't have a result for this hand yet |
| **Checking profile** | Studio is looking up the profile |
| **Connect a Wuji Glove to check** | No glove for this hand is connected, so Studio can't check |
| **Couldn’t check profile** | The lookup failed—try again |
| **Default profile** | You're on the `Default` profile, so results aren't saved |
Select the hand you want to calibrate in the sidebar. If more than one glove is connected for that hand, pick this run's capture source in the calibration entry first, then click the start button to enter the flow. An uncalibrated hand runs a **first-time calibration**. A calibrated one runs a **recalibration**—the flow is the same either way, and recalibrating overwrites that hand's current result.
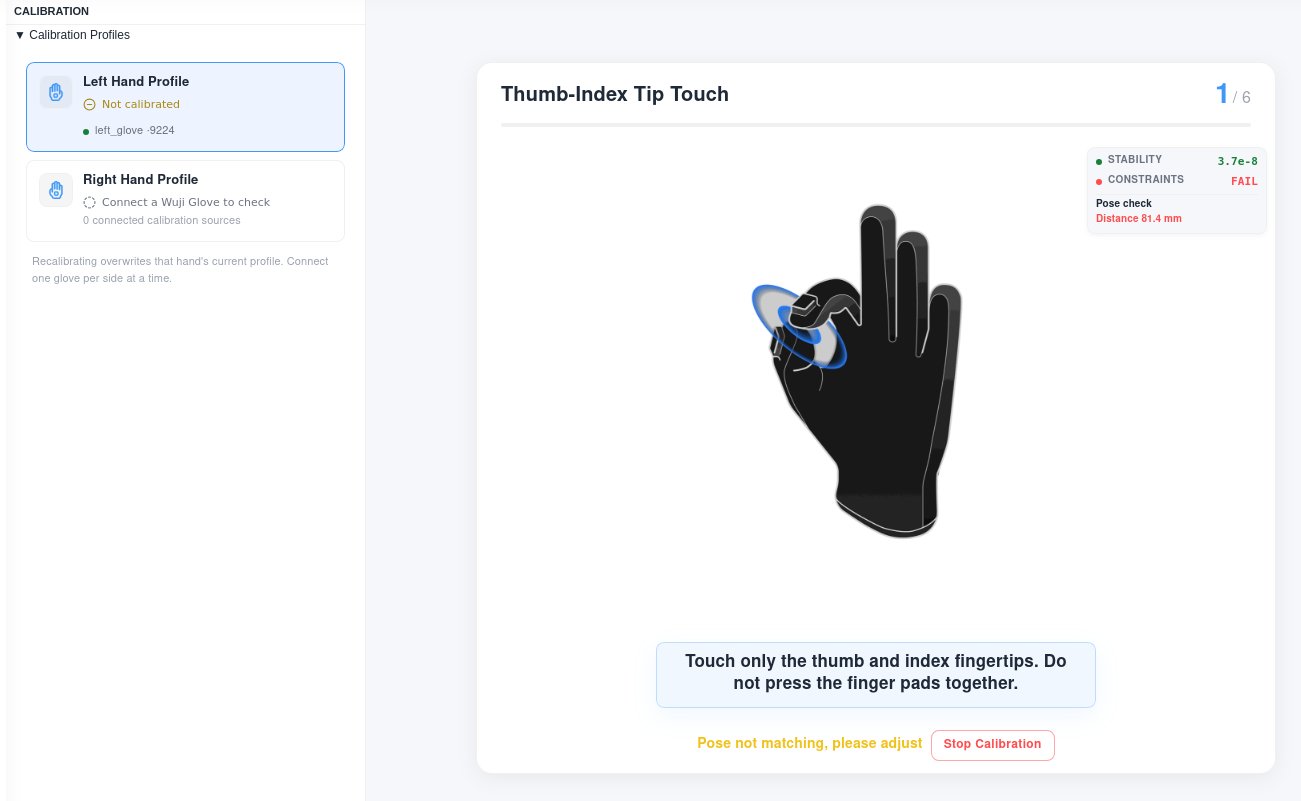
The flow screen has three areas: **left Calibration Profiles sidebar** (both hand profiles and their calibration status), **center guide area** (current pose name and progress like **Thumb-Index Tip Touch · 1/6**, guide image, status hints, and **Stop Calibration** to abort the run), and **data panel** at the top right of the guide area (real-time SDK diagnostics).
### Data Panel
While calibration runs, the panel at the top right of the guide area shows two metrics side by side:
| Metric | Meaning |
| - | - |
| **Stability** | Data variance. Green dot = acceptable, yellow = too high |
| **Constraints** | Whether the pose meets its constraints: `PASS` (green) / `FAIL` (red) On `FAIL`, **Diagnostics** expands, and the items vary by pose: · **Pinch poses** group by contact (e.g. "Thumb-Index tip contact") and show measured / target, such as `Distance 85.1 mm / 45.0 mm`, `Axis 23.5° / 100°–180°` · **Four-finger bend / flat** show passing fingers (e.g. `Fingers OK 0/2`) and failing items (e.g. `Index: Roll failed`) |
## Starting Calibration
Before starting, make sure:
* The device is worn correctly and snugly
* Your wrist and fingers can move freely
* The environment meets the device's requirements (away from metal objects and strong interference)
* The device is powered on
Select a hand on the home page and click the start button to enter the flow, then run through 6 poses in order. See [Pose Reference](#pose-reference) below for each pose's illustration and tips.
### Completing a Pose
Calibration runs automatically—no manual clicks. Once you hold a pose, the system detects, collects, and advances on its own:
1. Pose your hand following the guide
2. The system detects the pose and enters the **Stabilizing** phase, measuring how long you hold it steady
3. Once stable enough, it auto-advances to the **Collecting** phase and records data
4. When the pose completes, it shows **Step completed** and moves to the next pose automatically
Between poses, fully open your hand to keep the transition data clean. If a step fails to collect, the screen prompts you and you can click **Recalibrate** to start over. Switching to another view during calibration interrupts the current run.
### Pose Reference
| Step | Illustration | Pose | Constraint | Operation guide |
| - | - | - | - | - |
| 1 | | Thumb-Index Tip Touch | Thumb–index EMF distance \< 5 cm, with the fingertips facing each other at an angle > 100° (tip-to-tip, not pad-to-pad) | Touch only the thumb and index fingertips. Do not press the finger pads together. |
| 2 | | Thumb-Middle Tip Touch | Thumb–middle EMF distance \< 5 cm, with the fingertips facing each other at an angle > 100° (tip-to-tip, not pad-to-pad) | Touch only the thumb and middle fingertips. Do not press the finger pads together. |
| 3 | | Thumb-Ring Tip Touch | Thumb–ring EMF distance \< 5 cm, with the fingertips facing each other at an angle > 100° (tip-to-tip, not pad-to-pad) | Touch only the thumb and ring fingertips. Do not press the finger pads together. |
| 4 | | Thumb-Pinky Tip Touch | Thumb–pinky EMF distance \< 5 cm, with the fingertips facing each other at an angle > 100° (tip-to-tip, not pad-to-pad) | Touch only the thumb and pinky fingertips. Do not press the finger pads together. |
| 5 | | Four-Finger Bend 90° | Index / middle / ring / pinky angles close to the target pose (thumb not constrained) | Bend the index, middle, ring, and pinky fingers together to about 90°—like a half-fist, not clenched, the thumb stays relaxed |
| 6 | | Flat Open | Index / middle / ring / pinky angles close to the target pose (thumb not constrained) | Open the hand fully with all four fingers extended and close together, palm steady, the thumb stays relaxed |
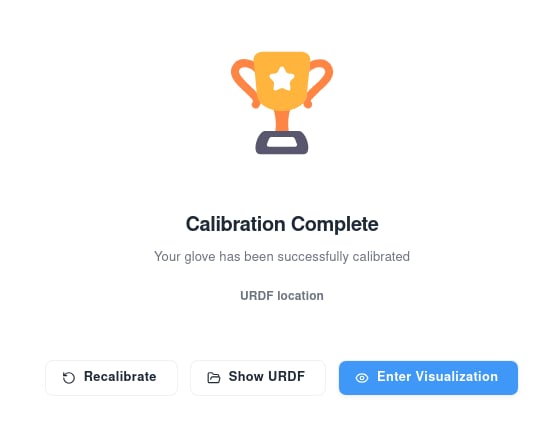
## Calibration Complete
After all 6 steps finish, the completion page appears with a confirmation message and three actions:
| Action | Effect |
| - | - |
| **Recalibrate** | Start over from step 1 immediately |
| **Show URDF** | Open the location of the generated hand URDF model file |
| **Enter Visualization** | Switch to the visualization view to confirm finger data looks correct and verify the calibration |
Under a named profile, calibration data is saved automatically and persists across Studio restarts. That hand's profile in the **Calibration Profiles** sidebar changes to **Calibrated**. Switch to another glove on the same side and the status stays **Calibrated**—no need to calibrate again.
### URDF Output Location
The generated URDF is saved per Studio user profile and per hand:
```
~/.wuji/sdk/users//models/left_hand.urdf
~/.wuji/sdk/users//models/right_hand.urdf
```
Studio writes to the file that matches the connected glove's hand. Gloves for the same hand share one result under the same profile, so calibrating one right-hand glove covers the next right-hand glove you connect. Each user profile keeps its own copy and switching users doesn't affect the others. Click **Show URDF** on the completion page to open the folder in your file manager.
The `Default` profile doesn't store calibration results. To calibrate, create and switch to your own named profile first. See [Basic Settings > User Profile](/en/docs/wuji-studio/basic-settings#user-profile) for how to create one.
### Debug Recording
When calibration starts, Studio automatically begins a recording named `Calibration Debug` that captures the current device's poses, transforms, IK, fingertip, and IMU data, excluding tactile streams. The recording stops automatically when calibration ends, whether it succeeds or fails.
Files save to the same directory as regular recordings—by default `/WujiStudio/recordings/`, configurable in Studio settings. If calibration keeps failing, send the matching file along with the device SN to [support@wuji.tech](mailto:support@wuji.tech).
**When to Recalibrate**
Recalibrate in these cases:
* The device was dropped or took a hard impact
* The device hasn't been used for a long time (we recommend checking every 3 months)
* Data looks clearly off (joint angles outside the normal range, fingers don't respond)
* After repair or part replacement
To recalibrate: click **Recalibrate** on the completion page, or return to the home page, select the hand, and click the start button to redo all 6 steps.
**Improve Pinch Accuracy During Teleoperation**
Calibration results vary with hand shape and wearing habits. Some users may notice imprecise pinching during [teleoperation](/en/docs/wuji-sdk/retargeting/). Adjusting your technique helps:
* Touch fingertip to fingertip instead of pressing the finger pads together
* If the dexterous hand still can't complete the pinch, offset your two fingers slightly and try again
## Troubleshooting
You may run into these during calibration:
| Symptom | Cause | What to do |
| - | - | - |
| A pose stalls with **Pose not matching, please adjust** | The current pose doesn't meet the constraints | Adjust to match the guide—touch fingertips lightly, don't press the pads |
| A pose times out (about 2 minutes) without completing | You never reached a valid pose | Re-pose and hold steady, then click **Recalibrate** to restart |
| The device disconnects mid-calibration | The device dropped offline or data was interrupted | Reconnect the device and restart from the home page |
| A profile in the sidebar shows **Couldn’t check profile** | Studio can't read the current user profile or the glove's hand information | Confirm the device is connected and you're on your own user profile, then retry |
| Calibration keeps failing | / | Restart Studio. If it persists, send the recording from [Debug Recording](#debug-recording) above along with the device SN to [support@wuji.tech](mailto:support@wuji.tech) |
This documentation is built and hosted on [Mintlify](https://mintlify.com), a developer documentation platform.
 The flow screen has three areas: **left Calibration Profiles sidebar** (both hand profiles and their calibration status), **center guide area** (current pose name and progress like **Thumb-Index Tip Touch · 1/6**, guide image, status hints, and **Stop Calibration** to abort the run), and **data panel** at the top right of the guide area (real-time SDK diagnostics).
 ### Data Panel
While calibration runs, the panel at the top right of the guide area shows two metrics side by side:
| Metric | Meaning |
| - | - |
| **Stability** | Data variance. Green dot = acceptable, yellow = too high |
| **Constraints** | Whether the pose meets its constraints: `PASS` (green) / `FAIL` (red)
### Data Panel
While calibration runs, the panel at the top right of the guide area shows two metrics side by side:
| Metric | Meaning |
| - | - |
| **Stability** | Data variance. Green dot = acceptable, yellow = too high |
| **Constraints** | Whether the pose meets its constraints: `PASS` (green) / `FAIL` (red)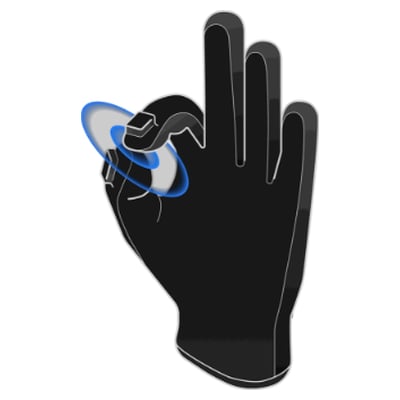 | Thumb-Index Tip Touch | Thumb–index EMF distance \< 5 cm, with the fingertips facing each other at an angle > 100° (tip-to-tip, not pad-to-pad) | Touch only the thumb and index fingertips. Do not press the finger pads together. |
| 2 |
| Thumb-Index Tip Touch | Thumb–index EMF distance \< 5 cm, with the fingertips facing each other at an angle > 100° (tip-to-tip, not pad-to-pad) | Touch only the thumb and index fingertips. Do not press the finger pads together. |
| 2 | 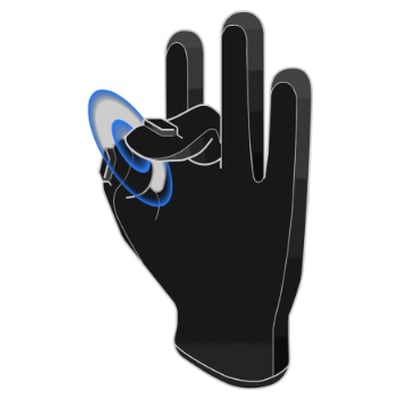 | Thumb-Middle Tip Touch | Thumb–middle EMF distance \< 5 cm, with the fingertips facing each other at an angle > 100° (tip-to-tip, not pad-to-pad) | Touch only the thumb and middle fingertips. Do not press the finger pads together. |
| 3 |
| Thumb-Middle Tip Touch | Thumb–middle EMF distance \< 5 cm, with the fingertips facing each other at an angle > 100° (tip-to-tip, not pad-to-pad) | Touch only the thumb and middle fingertips. Do not press the finger pads together. |
| 3 | 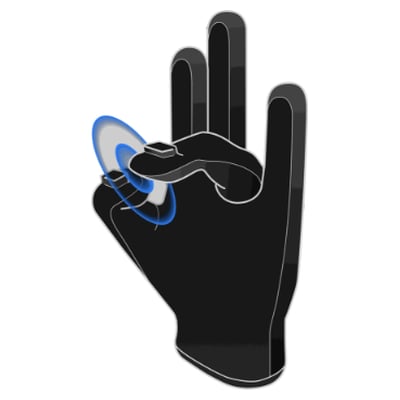 | Thumb-Ring Tip Touch | Thumb–ring EMF distance \< 5 cm, with the fingertips facing each other at an angle > 100° (tip-to-tip, not pad-to-pad) | Touch only the thumb and ring fingertips. Do not press the finger pads together. |
| 4 |
| Thumb-Ring Tip Touch | Thumb–ring EMF distance \< 5 cm, with the fingertips facing each other at an angle > 100° (tip-to-tip, not pad-to-pad) | Touch only the thumb and ring fingertips. Do not press the finger pads together. |
| 4 | 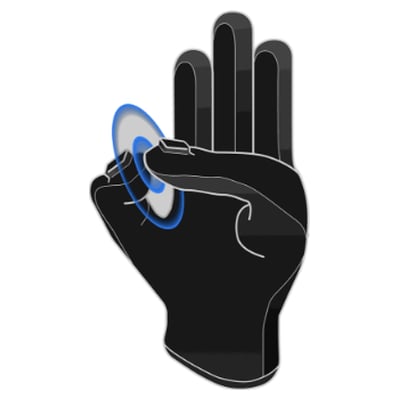 | Thumb-Pinky Tip Touch | Thumb–pinky EMF distance \< 5 cm, with the fingertips facing each other at an angle > 100° (tip-to-tip, not pad-to-pad) | Touch only the thumb and pinky fingertips. Do not press the finger pads together. |
| 5 |
| Thumb-Pinky Tip Touch | Thumb–pinky EMF distance \< 5 cm, with the fingertips facing each other at an angle > 100° (tip-to-tip, not pad-to-pad) | Touch only the thumb and pinky fingertips. Do not press the finger pads together. |
| 5 | 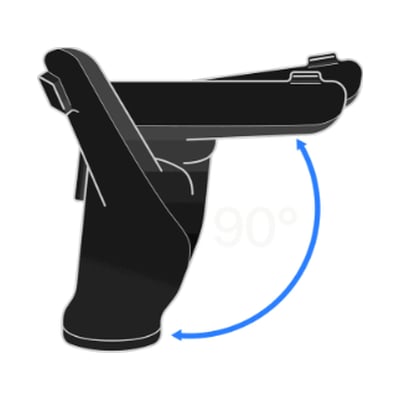 | Four-Finger Bend 90° | Index / middle / ring / pinky angles close to the target pose (thumb not constrained) | Bend the index, middle, ring, and pinky fingers together to about 90°—like a half-fist, not clenched, the thumb stays relaxed |
| 6 |
| Four-Finger Bend 90° | Index / middle / ring / pinky angles close to the target pose (thumb not constrained) | Bend the index, middle, ring, and pinky fingers together to about 90°—like a half-fist, not clenched, the thumb stays relaxed |
| 6 | 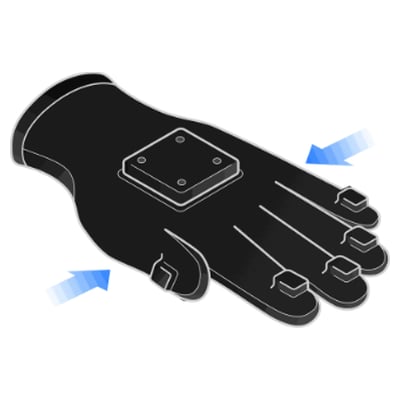 | Flat Open | Index / middle / ring / pinky angles close to the target pose (thumb not constrained) | Open the hand fully with all four fingers extended and close together, palm steady, the thumb stays relaxed |
## Calibration Complete
After all 6 steps finish, the completion page appears with a confirmation message and three actions:
| Flat Open | Index / middle / ring / pinky angles close to the target pose (thumb not constrained) | Open the hand fully with all four fingers extended and close together, palm steady, the thumb stays relaxed |
## Calibration Complete
After all 6 steps finish, the completion page appears with a confirmation message and three actions:
 | Action | Effect |
| - | - |
| **Recalibrate** | Start over from step 1 immediately |
| **Show URDF** | Open the location of the generated hand URDF model file |
| **Enter Visualization** | Switch to the visualization view to confirm finger data looks correct and verify the calibration |
Under a named profile, calibration data is saved automatically and persists across Studio restarts. That hand's profile in the **Calibration Profiles** sidebar changes to **Calibrated**. Switch to another glove on the same side and the status stays **Calibrated**—no need to calibrate again.
### URDF Output Location
The generated URDF is saved per Studio user profile and per hand:
```
~/.wuji/sdk/users/
| Action | Effect |
| - | - |
| **Recalibrate** | Start over from step 1 immediately |
| **Show URDF** | Open the location of the generated hand URDF model file |
| **Enter Visualization** | Switch to the visualization view to confirm finger data looks correct and verify the calibration |
Under a named profile, calibration data is saved automatically and persists across Studio restarts. That hand's profile in the **Calibration Profiles** sidebar changes to **Calibrated**. Switch to another glove on the same side and the status stays **Calibrated**—no need to calibrate again.
### URDF Output Location
The generated URDF is saved per Studio user profile and per hand:
```
~/.wuji/sdk/users/